
If you own a Yeastar/MyPBX IP PBX, setting up a SIP trunk to AlienVoip is just a few configuration away. By following the steps outlined below, your office connected to your Yeastar/MyPBX will enjoy cheaper calls to PSTN network.
Before attempting to configure your Yeastar/MyPBX IP PBX server, make sure that you are registered to AlienVoip and your account is activated with credits and at least 1 SIP username.
Please refer to https://www.alienvoip.com/mobile-voip/register-sip-account/ for a comprehensive guide for creating an account with AlienVoip
The guide below assumes that you own a Yeastar/MyPBX IP-PBX server and have completed the necessary steps mentioned above and agreed to our terms and conditions.
Step 1
Please login to your Yeastar/MyPBX
Step 2
Create A SIP trunk registered to AlienVoip.
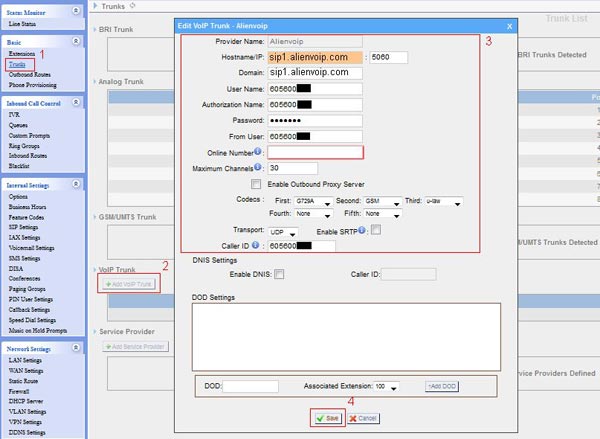
1. Click on “Trunks” on the side bar to setup a sip trunk.
2. Click on “Add VoIP Trunks” button, a popup will appear to collect the necessary information for a SIP trunk.
3. Fill in the necessary information, please login to your member account for your SIP username and password.
4. Save.
Step 3
Create outbound routes with dial pattern that will route outgoing calls to AlienVoip SIP trunk that was created in step 2
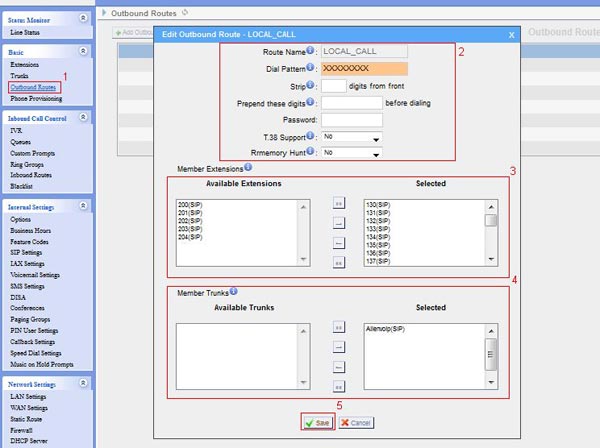
1. Click on “Outbound Routes”.
2. Name your route and fill in your dial pattern, “X.” without the quotes will match any dial sequence.
3. Select member extensions that will be sent to this outbound route when making calls.
4. Select the trunk that this route will use for making calls.
5. Save.
Once you have done all necessary configurations above, your server is ready to make calls to AlienVoip
Please contact our team if you need any support to configure SIP trunk at your PBX.