Tutorial

VoIP Call Recording with A401

Why Do We Need VoIP Call Recording?

There are various reasons when a company or a business needs VoIP call recording or some may refer it as “logging” technology. However, most of us would agree that the prime reason would be to increase the efficiency of your sales team or support team. With the recordings, your company sales / support team can further improve their services by handling customer complaints better, answering customer enquiries accurately or securing more customers through telephone sales. Ultimately, increasing revenues.

Read more

VoIP Call Waiting with Yealink T20P

AlienVoIP offers Yealink IP Phones which can perform VoIP call waiting. This will allow callers to reach your staff even when your staff are on the phone with another caller. This is able to create queues for incoming calls so that your employees are able to handle multiple inbound calls.

  1. When there is an incoming call, the screen at Yealink T20P screen will display the incoming call number.
     
    To switch to the 2nd caller, press HOLD to put the first caller on hold. Then, press “Down Arrow” key to navigate to the incoming number and press “OK” to answer the 2nd caller.
     
    VoIP Malaysia Call Waiting T20P 1
  2. After answering the 2nd caller and the person hungs up, you will be automatically returned to the first caller.
     
    VoIP Malaysia Call Waiting T20P 2
  3. Press “HOLD” again to release the first caller and continue your conversation.
     
    VoIP Malaysia Call Waiting T20P 3
  4. Repeat the steps above, when there are more incoming calls.

3CX Phone Softphone for iPhone iOS System

3CXPhone is a free softphone made available for iPhone users to make calls to any number. You can use this softphone with AlienVoIP, a VoIP service provider. You don’t have to tie up with another VoIP providers. It only takes a few minutes to setup the VoIP application and instantly enjoy AlienVoIP’s services.

Important: Please take note that the configurations below are created based on Version 1.1.5, first install in your iPhone.

Read more

AlienVoIP on Native Android SIP Client

NOTE: Native SIP Client feature is available in Android version 4.1 Jelly Bean and above.

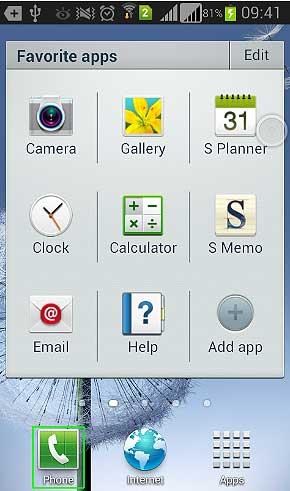
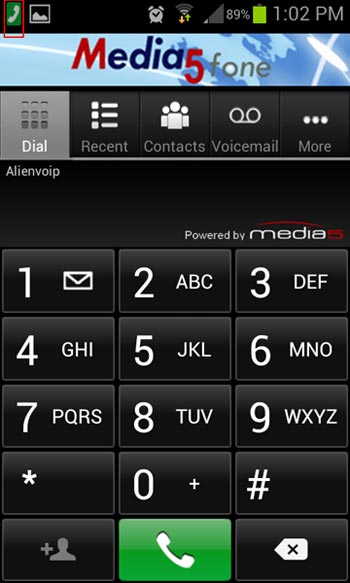
1. To use AlienVoIP, the installation is not needed as it uses a feature that has been provided in every Android mobile phone.To get started, please press on an icon named “Phone” which makes calls to others (as highlighted below).
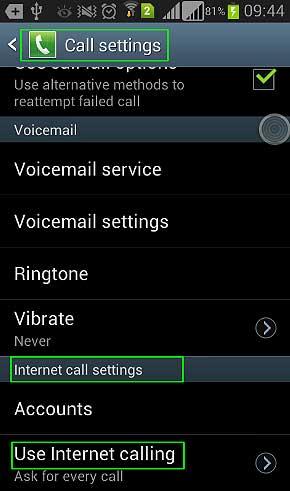
AlienVoIP with Android 1

Please click above to enlarge image.
2. Next, press on “Menu” then “Call Settings” to change the call settings.
AlienVoIP with Android 2

Please click above to enlarge image.
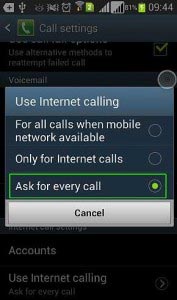
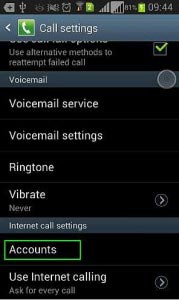
3. After that, scroll down to search for “Internet call settings” and modify the settings under this sub-section. Press “Use Internet calling” to change the calling setting.
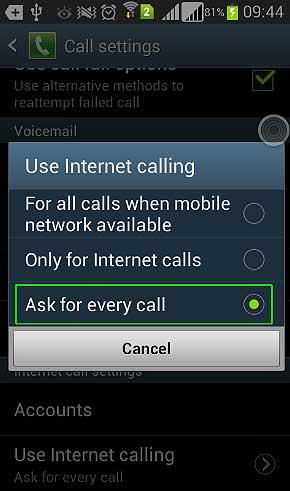
AlienVoIP with Android 3

Please click above to enlarge image.
4. After pressing on the sub-section “Use Internet calling”, choose your prefered option available.
AlienVoIP with Android 4

Please click above to enlarge image.
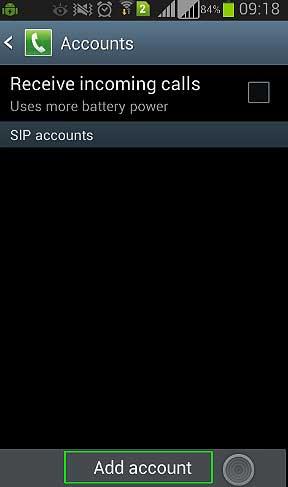
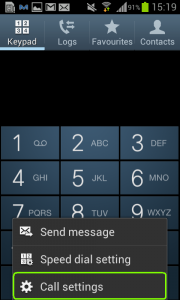
5. Next, press on “Accounts” to setup your AlienVoIP account.
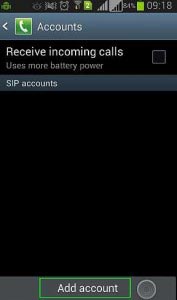
AlienVoIP with Android 5

Please click above to enlarge image.
6. Press on “Add account” button to add a new SIP account.
AlienVoIP with Android 6

Please click above to enlarge image.
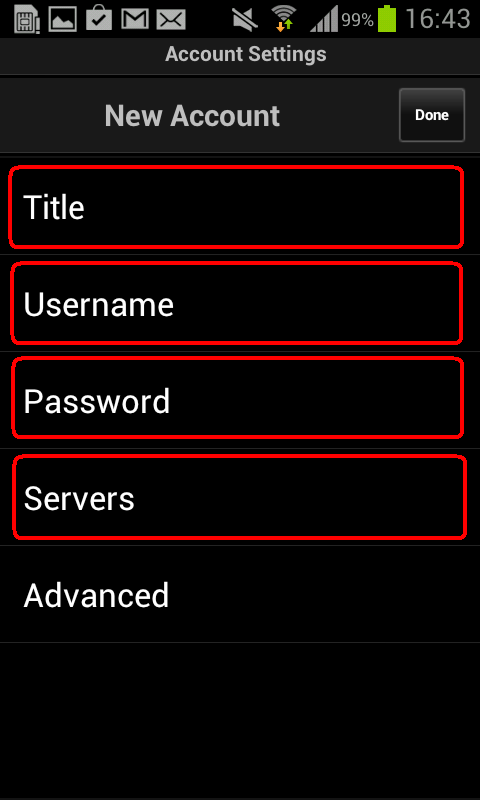
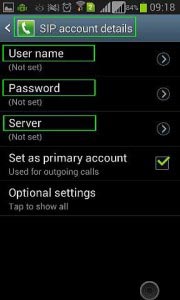
7. You will be requested to fill in all the SIP account details. Please fill in your AlienVoIP SIP username into “User name”, AlienVoIP SIP password into”Password” and lastly, AlienVoIP Server name into “Server”. The SIP username and password could be found in your AlienVoIP account which you have registered earlier.
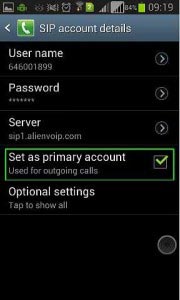
AlienVoIP with Android 7

Please click above to enlarge image.
8. After the filling in your AlienVoIP’s SIP username, SIP password, and server, you can now set this account as your primary account. Untick the checkbox if you do not want to set this account as your primary account.
AlienVoIP with Android 8

Please click above to enlarge image.
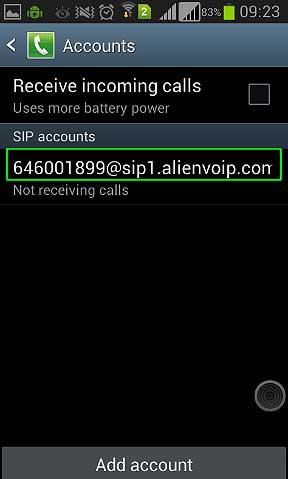
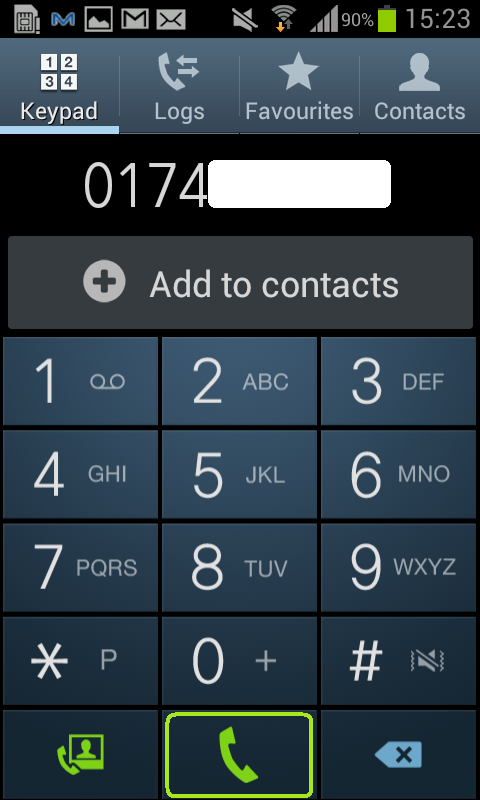
9. Press “Back” button to view your newly created SIP account.
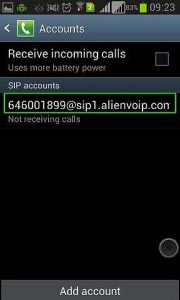
AlienVoIP with Android 9

Please click above to enlarge image.
10. Now, you are ready to make a call using AlienVoip. Type in your targeted phone number and start making calls.
Note: Please ensure your AlienVoIP account has sufficient amount of credit.
For international call, remember to enter 00 first, follow by country code, area code and lastly your destination number.
AlienVoIP with Android 10

Please click above to enlarge image.
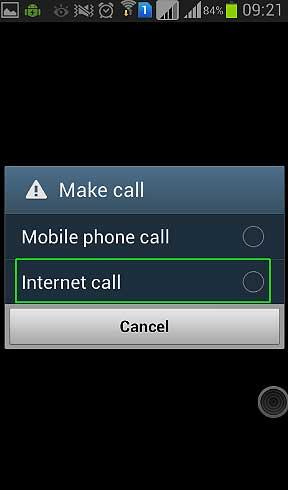
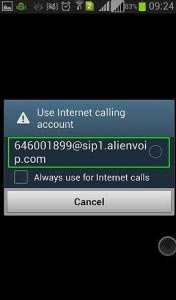
11. A message is prompted to acquire your choice of phone call route. Choose “Internet call” to make call using AlienVoip credit.
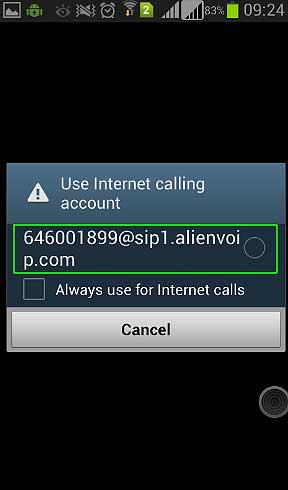
AlienVoIP with Android 11

Please click above to enlarge image.
12. After the choice of phone call route is decided, select your internet calling account to continue making your call. Now, the calling connection is connected and you are able to enjoy making call using AlienVoip.
AlienVoIP with Android 12

Please click above to enlarge image.

AlienVoIP with YeaLink T20P

1. Login to http://Yeastar-iphone-(your ip address). In the browser address bar, the IP address is 10.0.0.24.

Note: The IP address may be different for your network. Please check with your IT Department on that.

Please click image to view clearer.
VoIP Malaysia with Yealink T20P 1
Read more

Setting up AlienVoIP with A401 IP PBX

1. Go to http://yournetworkipaddress:9999/static/config/index.html (e.g. http://192.168.10.100:9999/static/config/index.html), and login to your IP-PBX using your username and password as shown below.

Username: admin
Password: admin

Please click to view clearer.
VoIP Malaysia AlienVoIP PBX A401 1

Read more

AlienVoIP with FreePBX

VoIP with FreePBX

FreePBX is an open source GUI used to manage your PBX. This guide below will show you how to setup AlienVoIP SIP Trunks. It is a common setup when using any VoIP provider SIP Trunks.

1. Login to your FreePBX.

VoIP Malaysia FreePBX 1
Please click above to enlarge image.

Read more

AlienVoIP with Android Media5-Fone

1. Before you start, please download Media5-fone Android App from Google Play.
VoIP Malaysia with Android 3CX 1

Please click above to enlarge image.
2. Click “Start” continue next screen.VoIP Malaysia with Android 3CX 2

Please click above to enlarge image.
3. Select Define manually.
VoIP Malaysia with Android 3CX 3

Please click above to enlarge image.
4. Enter your title, SIP Username and Password. Then, click Servers.
VoIP Malaysia with Android 3CX 4

Please click above to enlarge image.
5. Select Address and enter server address “sip1.alienvoip.com”. After you have finish inserting the address, click Done.
VoIP Malaysia with Android 3CX 5

Please click above to enlarge image.
6. You can now enjoy AlienVoIP quality services.
For international call, remember to enter 00 first, follow by country code, area code and lastly your destination number.
VoIP Malaysia with Android 3CX 6

Please click above to enlarge image.

Reload Prepaid Credit with AlienVoIP

1. Make sure you have an AlienVoIP Account. If you do not have an account, please contact us to assist you on setting up a VoIP account.

NOTE: If you have already purchased AlienVoIP’s Credits or just trying out AlienVoIP’s service with demo credits, please skip to step 3 and 4.

At www.alienvoip.com, roll over your cursor on “Buy Now” and click “Buy AlienVoIP Credit” at the dropdown menu.

VoIP Malaysia Reload Prepaid Credit 1

Read more